 |
Which
digital camera should I use? - Ultra compact digital cameras
Digital
cameras come in many different shapes and sizes. We can break this down
into five main types or designs of digital cameras and each camera with
in each of these design types might have a range of similar functions.
Ultra compact digital cameras
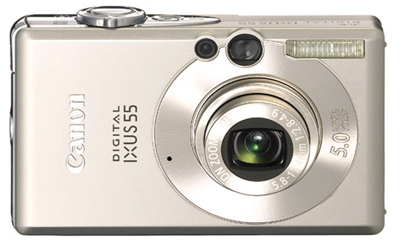 |
This
is perhaps the most common digital camera in the range. These cameras feel and look
like traditional film base ‘Point-and Shoot’ (P&S) automatic
camera. Their resolution ranges from 3.2 to 8.0 Megapixel or even higher.
While at the lower end of the market they have few functions with fixed-focal-length
lenses and can be brought for $40 as a give a way with a slab of Coke,
some have become very sophisticated cameras, that have high zoom capacities,
historgrams, a range of exposure modes etc. and can shoot Raw.
While
they don't have interchangeable lenses there are some models that allow
and extension lens to be added for telephoto or wide angle. These cameras
are largely used for recording a range of activities from daily events,
for use in Web page design or for sending images via the Internet or use
it to record VGA-size movies with sound.
There very compact size means that they can easily fit into a bag and be on hand when needed. |
Some aspects for consideration
Megapixels - Although a certain camera might have X number of Megapixels it is actually the physical size of the ccd that really counts. There is an article at
http://www.photo.net/equipment/digital/sensorsize/
that explains this. The mega pixel war is actually settling down so that cameras for the consumer market are coming in at about six to eight mega pixels – the fact is most people don’t make big enlargements and don’t need the extra size – so your camera will allow you to make larger high quality images. Large files sizes also take up storage space.
Lens - the lens is a very important aspect of the camera, understanding how this work and what the numbers mean is not essential to take photographs but it can help you take more creative images.
Check out what the info stamped on the lens means
A typical example for a camera like this might be:
f=6.3 - 18.9mm, equivalent to 35 - 105mm on a 35mm camera |
Approx. 5.7x magnification |
Aperture - Wide angle : F3.7 - F8.0, Telephoto: F4.2 - F9.0 |
This means that the aperture settings range from f3.7 - f8 with the lens at the widest angle of view- 6.3mm, and f4.2 - f9 when the lens is fully zoomed to 18.9mm focal length. |
 |
Aperture
Because the optical focal length of these cameras is very small with the aperture is situated inside the this lens construction they often don't have a huge ranges of apertures. In most cases this is limited to 3 settings, with the smallest aperture at f8. While it might be considered that f8 does not provide a great deal of depth of file, this is also related to the focal length of the lens. The smaller the focal length the greater the depth of field. So a 5.8mm wide angle lens as in the image above has much more depth of field than a 10mm wide angle lens on a larger format camera, or a camera with a larger CCD sensor.
Specifications
Model |
FinePix Z30 |
Number of effective pixels*1 |
10.0 million pixels |
CCD sensor |
1/2.3-inch CCD |
Storage media |
- Internal memory (Approx. 50MB)
- SD memory card
- SDHC memory card*2
|
File format |
Still image:
JPEG (Exif Ver 2.2*3)
Movie:
AVI (Motion JPEG ) with sound
Audio:
WAVE format, Monauralsound
(Design rule for Cameral File system compliant / DPOF-compatible) |
Number of recorded pixels |
Still image: 3,648 x 2,736 (10M) / 3,648 x 2,432 (3:2 format) / 2,592 x 1,944 / 2,048 x 1,536 / 1,600 x 1,200 / 640 x 480 pixels |
Lens |
Fujinon 3x optical zoom lens, F3.7 (Wide) - F4.2 (Telephoto) |
Lens focal length |
f=6.3 - 18.9mm, equivalent to 35 - 105mm on a 35mm camera |
Digital zoom |
Approx. 5.7x |
Aperture |
Wide: F3.7 - F8.0, Telephoto: F4.2 - F9.0 |
Focus distance (from lens surface) |
Normal:
· Wide: Approx. 60cm / 2.0ft. to infinity
· Telephoto: Approx. 60cm / 2.0ft. to infinity
Macro:
· Wide: Approx. 8cm - 80cm / 3.2in.- 2.6ft.
· Telephoto: Approx. 60cm - 3.0m / 2.0ft. - 9.8ft. |
Sensitivity |
Auto / Equivalent to ISO 64 / 100 / 200 / 400 / 800 / 1600 (Standard Output Sensitivity) |
Exposure control |
TTL 256-zones metering |
Exposure mode |
Programmed AE |
Shooting modes |
SR Auto, Auto, Natural Light, Natural Light & with Flash, Manual, Anti-blur, Successive Movie
SP:
Auction, Portrait, Landscape, Sport, Night, Night (Tripod), Sunset, Snow, Beach, Museum, Party, Flower, Text |
Image stabilization |
Anti-blur |
Shutter speed |
(Auto mode) 1/4sec. to 1/1000sec., (All other modes) 3sec. to 1/1000sec. |
Continuous shooting |
- Top-3 (max 0.6 frames/sec.)
- Final-3 (max 0.6 frames/sec.)
- Long-period
|
Focus |
Auto focus (Multi, Center) |
White balance |
Automatic scene recognition
Preset: Fine, Shade, Fluorescent light (Daylight), Fluorescent light (Warm White), Fluorescent light (Cool White), Incandescent light |
Self-timer |
Approx. 10sec. / 2sec. delay, Couple Timer, Group Timer |
Flash |
Auto flash
Effective range (ISO AUTO):
Normal:
· Wide: Approx. 70cm - 3.1m / 2.3ft. - 10.1ft.
· Telephoto: Approx. 70cm - 2.7m / 2.3ft. - 8.8ft.
Macro:
· Approx. 30cm - 80cm / 1.0ft. - 2.6ft.
Flash modes
- Red-eye removal OFF: Auto, Forced Flash, Suppressed Flash, Slow Synchro.
- Red-eye removal ON: Red-eye Reduction Auto, Red-eye Reduction & Forced Flash, Suppressed Flash, Red-eye Reduction & Slow Synchro.
|
LCD monitor |
2.7-inch, Approx. 230,000 dots, TFT color LCD monitor, Approx. 97% coverage |
Movie recording |
640 x 480 pixels / 320 x 240 pixels (30 frames/sec.) with monaural sound
- * Digital zoom function can be selected during movie recording.
|
Photography functions |
SR Auto (Scene Recognition Auto), Face Detection (with Auto Red-eye removal), Framing guideline, Frame No. memory, Silent mode |
Playback functions |
Face Detection (with Red-eye removal), Slideshow, Trimming, Trimming for blog, Playback type, Multi-frame playback (with Micro Thumbnail), Sorting by date, Image rotate, Voice memo |
Video output |
NTSC / PAL selectable |
Digital interface |
USB 2.0 High-Speed |
Power supply |
NP-45 Li-ion battery (included) |
Dimensions |
90.5 (W) x 59.0 (H) x 25.7 (D) mm / 3.6 (W) x 2.3 (H) x 1.0 (D) in. (excluding accessories and attachments) |
Weight |
Approx. 116.5g / 4.1oz. (excluding accessories, battery and memory card) |
Manual settings
For many situations automatic exposure is fine - but then there are always those really awkward lighting situations where you really need to get a photograph and the Auto setting is not going to work.
Find out if the camera has manual exposure settings and take the time to learn how to use them. It will give you a greater sense of control over the image, but you will find that you need to do some work to understand how all this interacts. Like many modern items of technology most of the features don’t get used because the user does not take the time to lean how they work. – So in terms of learning all those features, the best advice I can give is take your time to work through the manual one step at a time and apply the information as you go through it.
ISO
Shoot images and compare them on the screen of the computer rather than the LCD of the camera. So you might do an experiment with ISO to see when the image becomes noisy. Shoot the same image with different ISO settings and do a comparison.
I would suggest learning one function of the camera at a time and applying it over and over until you fully understand it. Then move on to the next.
Exposure
For instance with manual exposure mode you can set the shutter and aperture exactly where you want them. Here is a link to some info on this on my site - http://www.lloydgodman.net/tech/tech/Camera/CameradigSLR2.html
The image is mapped so click on a section to get more into ie manual exposure or ISO
Depth of field
You will find with the camera that because the focal length of the lens is very wide it will give you huge amounts of depth of field - which means that if you want to place a background out of focus and have the subject in focus you may find it difficult.
File types and size
It is very useful to know how files sizes and type work – Raw files are raw data that you can adjust the contrast, colour saturation, etc on they are what is recorded from the ccd. If you save your files as raw you always have the original data – but you will have to use a raw file converter to adjust the settings which give fantastic control but takes heaps of time – also the files sizes are large. There is some info no my site at http://www.lloydgodman.net/tech/tech/digital/Fileformats.html
Colour Space
Often the camera defaults to SRGB rather than Adobe RGB. This is a measure of the gamut or range of colours the camera will record – SRGB has a smaller gamut or number of discernable colours while RGB has the greatest. SRGB will work well for traditional portraits – weddings etc. It means the photographer will have to do less work in photoshop - but it can make our landscapes look a bit desaturated and bland – So you might want to shoot these in RGB. I shoot everything in RGB - Raw which give me the most information but the adjustments that the camera would normally make I have to complete in photoshop which take a lot of time.
LCD sceeen
Usually what you se on the LCD screen on the back of the camera is a jpeg which has the info compressed and settings applied from the camera software that it “feels” will be good for the shot.
Auto focus - In some situations you will find that the auto focus will not work – glass, dark areas etc are examples – often I turn it off and use the manual focus - which also saves batteries.
Photoshop - As mentioned at the start of the course – if you want to enhance or resize digital images you will need software to do this - Picassa – Gimp are free and can do most things – You will see the camera has a retouch menu – your better to do this in Photoshop if you can -
Photoshop will give you much more control - and as a student you can get it at an educational price - check out photoshop educational price on the net- the price reduction is huge.
Want to learn more? - do a workshop or one on one with Lloyd Godman
|