While
many people working with alternative processes see the it as an extension
of the traditional photographic process, and strive to create near perfect
prints via the traditional negative method, the potentials are much
more diverse than this.
Original
Film Negatives:
Because
many of these processes like the Cyanotype and Van Dyke Brown require
a contact negative, when working with original negs the format needs
to be of a reasonable size.
| Sheet
film, 4x5, 8x10 or even larger
can give highly detailed prints with a subtle tonal range when contact
printed via the Van Dyke Brown or salt process. |
|
A series
of 120, or even 35mm
negatives can be taped or placed together to make a larger
grid. |
4 - 6x6cm
negatives combined to create a larger negative for contact printing |
Copy
Film Negatives:
Continuous
tone or line negatives and positives may be made in a copy camera or
by projecting small negatives or slides in an enlarger onto sheet film
on the easel. Any graphic arts film, line film or copy film may be used,
such as Rapid Access, Kodalith, LPD4, QPD4, Kodak EL. See the high contrast
film page for more details. These may be obtained from a lithographic
supply company. Process film according to manufacturer's instructions,
OR for continuous tones on high contrast film, use a diluted paper developer
such as Dektol (1:1 or even more diluted, such as 1:4 or 1:10), or use
halftone screens when making the copy negatives. When making large negatives
in an enlarger, it may be necessary to project onto a wall or floor,
and to make an easel. Use a big piece of cardboard with the film size
drawn on it, and some masking tape to hold film if necessary. Ortho
films require a red safelight. Red cellophane may be used over a yellow
darkroom safelight.
Photocopy
Negatives:
Photocopies
usually allow the production of images onto A4 and A3 transparent Mylar
sheets. They also allow the image to be tonally reversed meaning the
image can be produced as a negative for printing back to a positive
image on the print. If you are making several Mylar Negs that need to
be registered for multiple printing, or enlarging a small image up very
large with each section A3 be aware that the image will expand at differing
rates depending how much black is in the image. This seems to be reduced
if you allow the copier to cool down between each copy. Black and white
photocopies produce a different type of transparency than a colour copier
or a laser printer, so some experimentation might be necessary.
Digital Negatives
Black and white digital negatives can be made from any digital image and this has become quite a science. We can begin with a colour image taken with the camera, a scanned image, an image created digitally or a combination of any of these. There are various ways to output digital images, some of which are are listed below.
Ink
jet prints:
These
can be printed onto transparent material from a computer file and make
excellent negatives. The tonal scale can be altered on the computer
to suit the printing technique desired.
Agfa Copy Jet Film
Agfa, CopyJet, SelectJet & Film Solutions
Folk’s would like to introduce you to the easiest way to produce film from an InkJet printer for screen printing using the FastRip, Mega Rip, Wasatch Rip an Epson 4000 range or an Agfa Sherpa 24m, Agfa Sherpa 44m and Agfa CopyJet/SelectJet Films.
Colour separations and halftone images on high-density inkjet film for screen printing
SelectJet/CopyJet Screen Film is a high-density inkjet films for use in piezo inkjet systems working with black, dye-based ink. Both films have been specially developed for producing colour separations for screen printing applications. They have a special ink-receiving layer for optimum density and ink acceptance.
Address:
Folk & Company Pty Ltd
54 Trade Place
North Coburg
VIC 3058 Phone: 03 9350 6446
Fax: 03 9350 6225
Email Orders: orders@folk.com.au
Managing Director:
Proudly third generation Folk at your service.
Mr Peter Folk
folk@folk.com.au |
|
Image
setter Negs
|
|
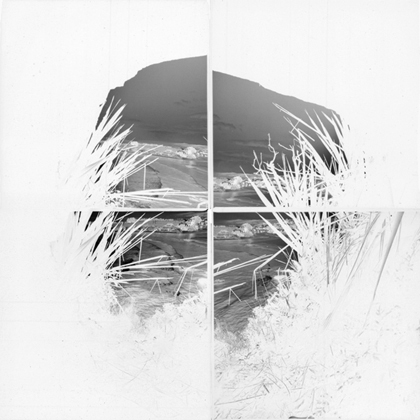
Composites:
Piece
together several 8"x10" sheets for larger images or A3 sheets
of Mylar. Overlapping edges will show up as less exposed areas on print.
If this is undesirable, cut pieces to fit exactly. Secure with tiny
pieces of clear tape in unobtrusive places. Or, use overlaps and pieces
of tape as part of the design. Thin paper printouts: These may also
be used, but will need long exposures, approximately twice as long as
needed for clear film. The paper grain might show up in the image.
Clich'e
verre:
Draw
or paint on clear plastic or thin paper. Try black or red marking pen,
India ink, film opaque, whiteout, litho crayon, black cattle marker,
black oil pastel. Shadings in pencil may or may not come out well. Use
paper or rubylith and cellophane cutouts.
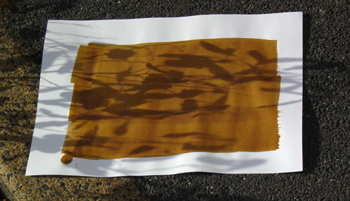
Photograms:
Any
object laid on the sensitised paper can be used to make photograms.
Opaque materials will block the light and appear as blank spots; transparent
and translucent materials will make areas of tones.
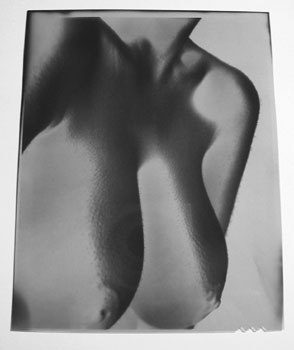
True
Shadowgrams:
With
emulsions that require an extended exposure to sunlight, oblique shadows
from real objects out doors can be used to make images.

